Payments, Deposits & Refunds
Customers can pay for a quote or order online, through the links OrderPilot sends them, or in person, by cash, check, or card terminal. OrderPilot keeps both in one place. Online payments arrive on their own. Payments you take another way, you record yourself with Collect payment, so the balance, the payment badge, and Shopify all stay correct.
This article explains how payment works on a quote or order, how to collect or record a payment, how deposits and pay-later orders work, where to find the payment and invoice history, and how to give a cash refund.
Before You Start#
Consider the following questions before getting started:
How does a quote become a paid Shopify order?#
Until it is paid, every quote and order lives in Shopify as a draft order. The draft becomes a real Shopify order the first time a payment is collected, or when you create the order on pay-later terms. From then on, further payments are added to that Shopify order.
Is your shop on Shopify Plus?#
Deposits and partial payments that you record by hand need Shopify Plus. On other plans, you record the full balance in one go.
Should customers wait until you allow payment?#
If your shop holds back customer payment until you enable it, see Request Signature & Payment. Payments you collect yourself are never blocked by that setting.
Reading the Payment Details#
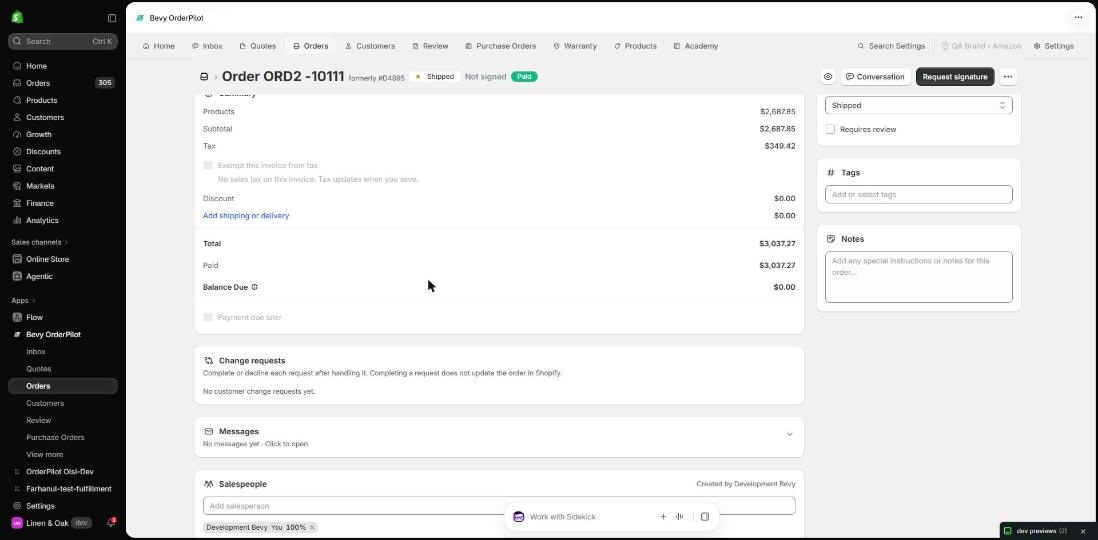
The payment badge next to the record's title, and in the Payment column of the lists, shows where payment stands:
| Badge | What it means |
|---|---|
| Unpaid | Nothing has been paid yet. |
| Partially Paid | Some of the total is paid and a balance is due. |
| Paid | The total is paid in full. |
| Authorized | A card payment is authorized but not yet captured in Shopify. |
| Partially Refunded / Refunded | Some or all of what was paid has been refunded. |
| Voided | The payment was voided in Shopify. |
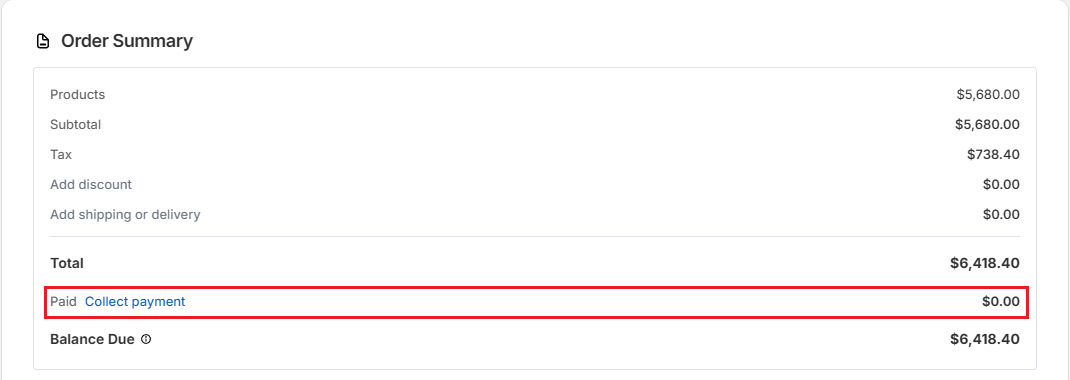
The Quote Summary (or Order Summary) card shows the numbers under the Total:
- Paid: Everything received so far.
- Refunded and Net payment: Shown once a refund exists.
- Refund Owed: Shown when the customer has paid more than the current total, for example after you removed a line.
- Balance Due: The total minus payments received.
How to Collect a Payment You Received?#
Use this when the customer paid in person or by another method, such as cash, check, or a bank transfer. Nothing is charged to the customer from OrderPilot. You are recording money that already arrived.
Step 1: Open the quote or order and save any changes first.
Step 2: Click "Collect payment" next to Paid in the summary card, or click the ••• button at the top of the page and choose the payment option. The option's name depends on where the record is (see the table below).
Step 3: Check the amount in the window. On a Shopify order you can also add a Note, for example a check number. Then confirm.
| Where the record is | ••• menu item | Window | What confirming does |
|---|---|---|---|
| Draft order in Shopify, no payment terms | Mark as paid | Collect payment | Record payment and create order records the full total as paid and creates the Shopify order. |
| Draft order with Payment due later, no deposit | Create order ( pay later ) | Create order | Create order creates the Shopify order without taking payment. The balance stays outstanding. |
| Draft order with a deposit (Shopify Plus) | Collect payment | Record manual payment | Collect payment records the deposit and creates the Shopify order. The balance can be collected later. |
| Shopify order with a balance (Shopify Plus) | Collect payment | Record payment | Records the amount you enter, in full or in part. |
| Shopify order with a balance (other plans) | Collect payment | Mark as paid | Records the full remaining balance as paid. |
Note: Collect payment is greyed out while you have unsaved changes, while Shopify is still catching up with your last save, or when no location is selected. Hover over it to see which.
Collecting payment from the order edit screen#
You can also start a payment from the edit screen itself without going to the ••• menu. A Collect payment button appears in the summary area when a balance is outstanding. Clicking it opens the same Shopify checkout flow that the sign page Pay button uses, so the customer is taken through the standard Shopify checkout experience. This is useful when a staff member is on the phone with a customer and wants to send a checkout link without leaving the edit screen.
Recording a partial payment (Shopify Plus)#
On a Shopify order with a balance, the Record payment window says how much is due now.
Step 1: Enter the Amount. Use Type to switch between Amount and Percentage.
Step 2: Check the line under the fields. It says This is a full payment or This is a partial payment.
Step 3 (Optional): Add a Note, for example "Check #4410". Notes can be up to 255 characters.
Step 4: Click "Record payment". OrderPilot confirms Payment recorded for order with the Shopify order number.
Deposits#
A deposit asks the customer to pay a percentage of the total up front and the rest later. Deposits need Shopify Plus.
Step 1: On the quote, turn on Payment due later in the summary card and choose the Terms.
Step 2: Click "+ Require deposit" and enter the Deposit required percentage, for example 30%.
Step 3: Save.
The customer is then asked for the deposit, not the full total: the sign page shows a deposit button, and the Request payment email asks for the deposit amount. When the deposit is paid, online or with Collect payment, the Shopify order is created and the rest stays as the Balance Due. Customers can pay the remaining balance later from their order page. See My Orders & Tracking.
Note: The deposit and payment terms can only be changed while the record is still a draft order in Shopify. After that, they are read-only.
Deposit → balance flow#
The deposit and balance flow in sequence:
- Quote time — you set the deposit percentage (e.g. 30%). The sign page shows only the deposit amount as due now.
- Deposit paid — the customer pays the deposit online or you record it manually. The draft converts to a Shopify order. The badge shows Partially Paid and the remaining 70% stays as the balance due.
- Order placed or scheduled — the balance becomes payable. You can send a payment request for the balance, or collect it in the showroom.
- Before fulfillment — by default, the full amount must be collected before OrderPilot marks the order ready to fulfill. This threshold is configurable per shop; ask your account manager if you need to adjust it.
Pay-Later Orders#
For a trade client such as Studio Lumen Design on Net 30 terms, you can place the order now and collect payment later.
Step 1: Turn on Payment due later and choose the Terms, for example Net 30, and the Issue date. Save.
Step 2: Click the ••• button and choose "Create order ( pay later )".
Step 3: In the Create order window, click "Create order".
The Shopify order is created with the full balance outstanding and the payment terms attached. Collect the payment later with Collect payment, or send the client a payment request.
Customer Payment Gate#
OrderPilot prevents a customer from over-paying when they use the sign page.
- Due-now cap: The Pay button on the sign page only lets the customer pay up to the amount that is currently due. If your shop uses deposits, that cap is the deposit amount. If the full balance is due, the cap is the full balance.
- Live updates: If the outstanding amount changes while the customer has the sign page open — for example because a staff member edits the order — the Pay button and the amount shown update automatically. The customer does not need to refresh.
- Staff override: From the order edit screen, a staff member with the right permissions can adjust the due-now amount before sending the sign page link. This lets you, for example, ask a customer to pay only the delivery charge first and the rest on pickup.
Overlapping Payment Request Guard#
If two staff members click "Request payment" at nearly the same time, OrderPilot sends only one email.
- The first request goes through normally.
- The second request, if it arrives within a short window of the first, is silently ignored.
- The staff member who clicked second sees a banner: A payment request was already sent N minutes ago. No duplicate email reaches the customer.
This guard is automatic. There is nothing to configure.
Payment Status on Split Orders (F13 Phase B)#
When an order is split into two Shopify orders, the payment section of the edit screen shows each part separately.
| Column | What it shows |
|---|---|
| Payment 1 of 2 | The due amount, collected amount, and Pay button for the first Shopify order. |
| Payment 2 of 2 | The due amount, collected amount, and Pay button for the second Shopify order. |
Each part has its own checkout flow. Once a part is fully paid, its row is dimmed and the Pay button is replaced with a Paid indicator. The overall payment badge reflects the combined status of both parts.
Payments and Invoices History#
Click the ••• button on a quote or order and choose "Payments and Invoices". The window has two tabs.
Payments#
Lists every payment request, payment, and refund for the record, with dates. For a payment request that has not been paid yet:
- "Copy Invoice URL" copies its checkout link.
- "Cancel request" (or "Cancel invoice") stops the link working. Click "Keep" to change your mind. A cancelled request's link no longer works.
The Refunds section lists refunds, with the Order Total and Total Refunded.
Invoices#
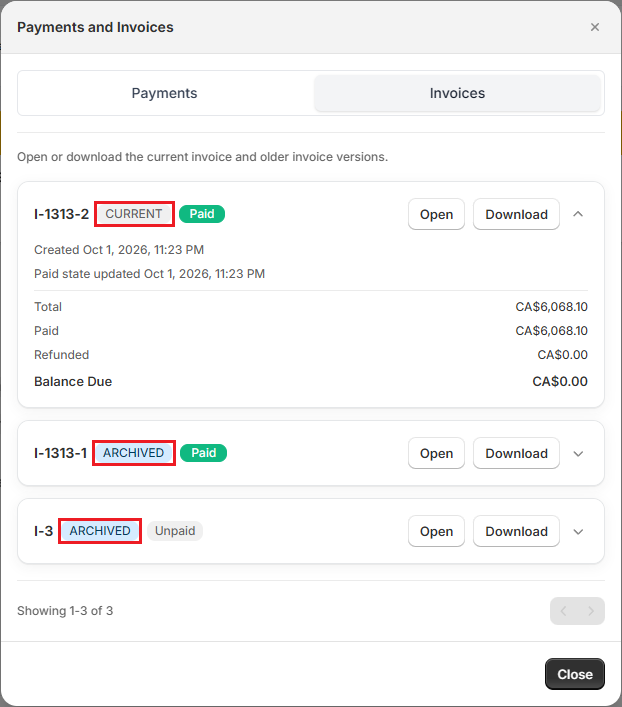
Lists the record's invoice versions. While nothing has been paid, edits to the order update the current invoice. When a payment is recorded, OrderPilot keeps the invoice as it stood before and after the payment, and starts a new current version. The current one is marked CURRENT and earlier ones ARCHIVED, each with a Paid or Unpaid badge. Click "Open" to view one or "Download" to save it as a PDF. Expand a row to see its Total, Paid, Refunded, and Balance Due at that time.
Pro Tip: To download only the latest invoice, choose "Download Invoice" from the ••• menu. See Order Actions & Documents.
Cash Refunds#
Use this when you hand money back to the customer yourself.
Step 1: Click the ••• button and choose "Refund Payment". It only appears once something has been paid that is not yet refunded.
Step 2: In the Refund (Cash) window, check Max refundable, then pick one of the Quick amounts (by item price) or type an Amount.
Step 3: Click "Refund".
The refund is recorded on the Shopify order and appears in Payments and Invoices. The summary card shows Refunded and Net payment, and the payment badge changes to Partially Refunded or Refunded.
Note: This records a cash refund. It does not send money back to the customer's card. To refund a card payment, refund it from the order in your Shopify admin.
Refund Policy#
Refunds in OrderPilot are always tied to a Shopify payment. When a refund is processed:
- OrderPilot records a refund event on the order. The event appears in Payments and Invoices with the date, amount, and who issued it.
- Partial refund: The amount collected on the relevant order line is reduced. The payment badge changes to Partially Refunded and the summary card shows a Refunded row and an updated Net payment figure.
- Full refund: The order line is marked as refunded. The overall payment badge changes to Refunded and the Balance Due returns to zero (or reflects any remaining unpaid lines). The order status updates to reflect the refund.
To refund a card payment to the customer's original payment method, process the refund from the order in your Shopify admin. Once Shopify records the refund, OrderPilot picks it up automatically and updates the badge and summary.
Example: Deposit, Then Balance in the Showroom#
Studio Lumen Design orders four Linden Sofas for a hotel project. Harlow & Finch Interiors is on Shopify Plus and asks for a 30% deposit.
- The designer turns on Payment due later, chooses Net 30, clicks "+ Require deposit", enters 30, and saves.
- They click "Request payment". Studio Lumen pays the deposit online. The order is created in Shopify, and the badge shows Partially Paid.
- When the sofas are ready, the client's accountant drops off a check for the balance.
- The designer clicks the ••• button, chooses "Collect payment", enters the remaining balance in Amount, adds the note "Check #1182", and clicks "Record payment". The badge changes to Paid.
Important Notes & Tips#
Collect payment does not charge anyone#
It records money you already received. To charge a customer's card, send a payment request so they pay through Shopify checkout.
Paying does not depend on signing#
Recording a payment does not require a signature. But a quote that is both signed and paid becomes an order automatically.
Payment terms come from Shopify#
The Terms list shows the payment terms available in your Shopify store. If Payment due later does not appear, your store has no payment terms to choose from.
Need Help?#
Have a question about recording a payment, setting up a deposit, or refunding a customer? Reach out to us at support@bevycommerce.com, and we'll help you get the numbers right.