Warranty & Serial Numbers
Warranty is always active in OrderPilot — there is no enable switch. Terms are resolved automatically for every order line from a six-level ladder and shown on the order, on customer documents, and in a searchable coverage panel.
How the Warranty Ladder Works#
OrderPilot walks six levels from most general to most specific. The last level that has a value wins.
| Level | Where it's set |
|---|---|
| 1 | Store default |
| 2 | Vendor |
| 3 | Category |
| 4 | Category + Vendor |
| 5 | Template override |
| 6 | Order line override |
Term states:
- null — not set; inherit from the next level down.
- 0 — explicitly excluded. Displays as Excluded.
- > 0 — covered for that many months. Whole years display as years (60 months → 5 years).
A line with no term at any level reads Not covered. Setting 0 at the store default prevents "Not covered" from appearing when a more specific rule is missing — your team can tell a decision from an oversight.
Vendor labels follow your shop's terminology setting. If you call vendors "Suppliers", the vendor level reads Default supplier policy.
Configure Warranty Settings#
Step 1. Go to Settings → Warranty settings.
Step 2. Set the Store default — the term (in months) every product gets unless a more specific rule applies.
Step 3. Click Vendor policy. Click Set a term next to any vendor whose products carry a different warranty. Leave a vendor blank to follow the store default. From a vendor's ⋯ menu you can also choose No warranty from this vendor or Follow the store default.
Step 4. Click Category policy. Click Add a rule, choose a Category, optionally a Vendor, enter the Warranty term in months, and click Add rule. A rule with a vendor beats a rule for the category alone.
Changes save as you go.
Set Warranty on a Template#
Step 1. Open a template from Products.
Step 2. Find the Warranty card. It shows the term a new order line would receive today and where it comes from (e.g. Category rule).
Step 3. To override the term for this template, click Review warranty, enter a term in months, and click Save. To follow the product term again, clear the override.
Step 4. To add per-option exceptions (e.g. a fabric covered for fewer months than the frame), open Review warranty and add exceptions in the Option exceptions section.
Step 5. To require a serial number for each fulfilled unit of this product, select Require a serial number on the Warranty card.
Use Check an item on the template page at any time to see what term would apply to a new line and why.
Create Extended Warranty Plans#
Extended warranty plans are priced and sellable. They stack additional months on top of a product's resolved term and appear as a separate fee line (type WARRANTY_PLAN) on the order.
Step 1. Go to Settings → Warranty settings → Extended warranty.
Step 2. Click New plan.
Step 3. Fill in the plan:
| Field | Notes |
|---|---|
| Name | Shown to staff and customers, e.g. "5-year protection". |
| Price to the customer | Plan price per unit. Never discounted. |
| Cost to you | Your internal cost. Customers never see it. |
| Months it adds | Stacked on top of the product term. |
| What it covers | The whole product, or named parts only. |
| Require a serial number | Enforce serial entry at fulfillment for this plan. |
Step 4. Click Create plan.
To change a plan, use Edit from its menu. Edits apply to future sales only. To stop offering a plan, choose Archive — existing lines keep it. A plan never sold can be deleted. Use Restore to reactivate an archived plan.
Add an Extended Warranty Plan to an Order#
Plans can be added in the Shopify admin only. POS shows plans already on an order but cannot add them.
Step 1. Open a quote or order.
Step 2. On the product line, open the ⋯ menu and select Review warranty.
Step 3. In the Extended warranty section, click Add a plan.
Step 4. Click Add next to the plan you want.
The plan becomes its own line priced at the plan price × line quantity. Each product line can carry one plan. To remove it, click Remove in the same window.
Override a Warranty Term on an Order Line#
You can override the resolved term for any individual line, set it to Not covered, or lift an existing exclusion.
Step 1. Open the order.
Step 2. On the line, open the ⋯ menu and select Review warranty.
Step 3. Change the term or set Not covered, then save.
Step 4. Click Why this? on any line to see a numbered trace showing exactly how the ladder arrived at the displayed term.
Use Check an item on the line to see what term applies before committing a change.
Warranty on Order Create#
The ladder is evaluated live as you build a new order before it is saved. The resolved term is applied inside the create transaction, so no manual step is needed.
Record Serial Numbers#
Serial numbers are entered after Shopify fulfills the units.
Step 1. Open the order. A line that requires serials shows a chip such as Serials 2 of 2 missing.
Step 2. Click the chip, or open the line's ⋯ menu and select Serial numbers.
Step 3. Enter a serial number for each fulfilled unit. Unfulfilled units stay greyed out until Shopify fulfills them.
Step 4. Click Save.
You can save with some fields blank. The chip updates to show how many are still missing. A serial number already used on another unit cannot be saved twice.
Serials are searchable in the coverage panel and through the status API. POS shows serial numbers in Fulfillment details but cannot enter them.
When Coverage Starts#
| Fulfillment type | Clock starts |
|---|---|
| Delivery | When a Shopify fulfillment webhook fires with shipment_status: delivered |
| Local pickup | When the fulfillment is created in Shopify |
| Manual start | Staff set a start date on the warranty panel |
An hourly fallback reconciler catches any missed fulfillment or delivery webhooks automatically.
To start cover manually on a unit that was delivered without triggering the webhook, click Mark this unit delivered on the coverage panel, choose the Delivered on date, and click Start cover.
Look Up Coverage#
Step 1. Go to Settings → Warranty settings → Coverage (or open a customer's order and click Coverage on the products card).
Step 2. Search by customer, order number, or serial number.
Step 3. Each delivered line shows its options, the term, the source of that term, and the remaining cover — e.g. 14 months left or Expired 2 months ago. Purchased plans appear with a Paid for badge.
Only delivered orders appear, because cover has not started on anything else.
Warranty Claims#
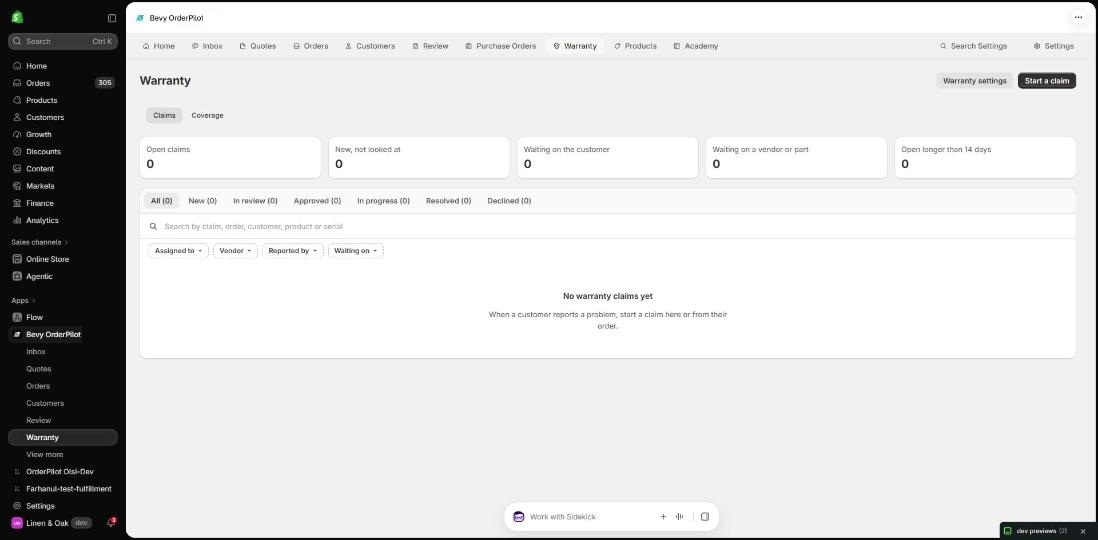
Log a claim:
Step 1. Go to Settings → Warranty settings → Claims.
Step 2. Click New claim and select the covered order line.
Step 3. Fill in the claim details and submit. The claim enters the review queue.
Review and resolve:
Open a claim from the queue to review it. Resolution options include repair, replacement, or vendor claim. Resolved claims are archived but remain searchable.
Warranty on Customer Documents#
Quote PDFs, invoice PDFs, and the customer sign link all show the warranty for each line — e.g. Warranty: Product (60 months). A sold extended plan prints as its own line under its product. Your cost and the internal ladder trace are never shown to customers.
Example: Warranty at Harlow & Finch Interiors#
| Rule | Applies to | Term |
|---|---|---|
| Store default | Everything | 12 months |
| Vendor policy — Everoak Designs | All Everoak products | 24 months |
| Category + Vendor — Living Room › Sofas, Atelier Homeworks | That category from that vendor | 60 months |
A Halsey Platform Bed from Everoak Designs → 24 months (vendor rule). A Linden Sofa from Atelier Homeworks → 60 months (category + vendor rule). A Mira Dining Chair from Birch & Beam Woodworks → 12 months (store default).
Marcus Reed buys the Linden Sofa and his rep adds a "5-year protection" plan (+60 months), giving 120 months of cover from the day the sofa is delivered.
Need Help?#
Reach out at support@bevycommerce.com and we'll help you set up your warranty rules and plans.