Email Settings & Notifications
OrderPilot sends customers their quotes, invoices, signature requests, and payment requests from your own domain, using designs you control. Automatic notifications fire when an order reaches a status, and every email is logged against the order so nothing falls through the cracks.
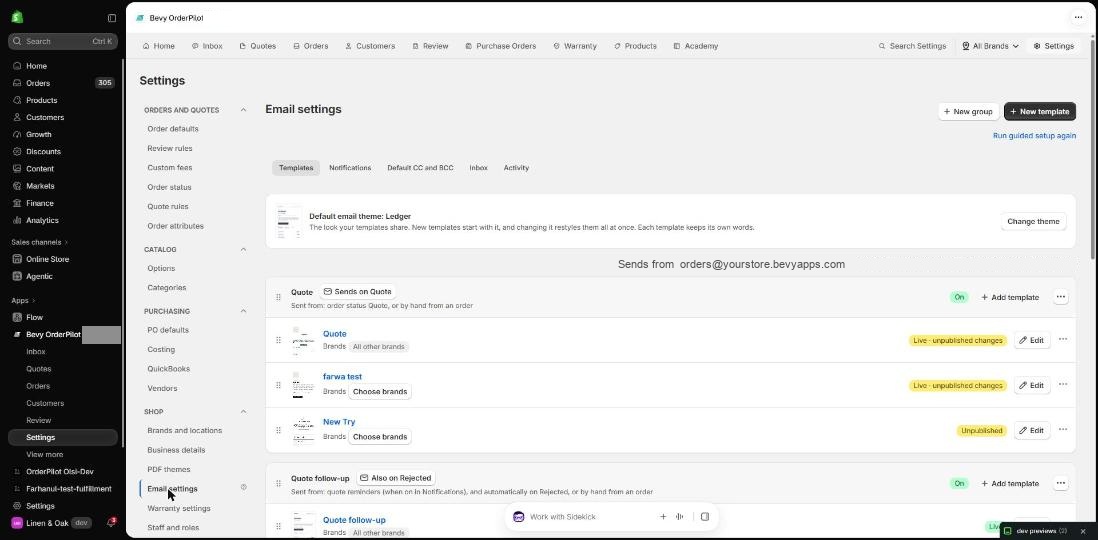
Go to Settings → Email to find five tabs: Emails, Sender, Notifications, Default CC, and Activity.
Before You Start#
Business details and logo first. Emails inherit your company name, logo, and brand colours from Settings → Business details. Add those before you design templates.
DNS access. To send from your own address (for example orders@harlowfinch.example) you need to add DNS records at your domain provider. If someone else manages your domain, ask them to add the records.
Sender Tab#
The Sender tab is where you connect your sending domain and control what customers see in their inbox.
Set Up Email Sending#
A Set up email sending checklist appears until sending is configured:
- Your sending address. Enter your website domain, a sender name (the name customers see, such as "Harlow & Finch Interiors"), a sender email address, and an optional reply-to address. Click Save and continue.
- Verify your domain. OrderPilot shows a table of DNS records. Use Copy host and Copy value to add each record at your domain provider, then click Check again. Each row shows Found once detected. DNS propagation can take time; OrderPilot keeps checking automatically.
- Turn on sending. Click Turn on to allow customer emails.
- Customise your emails (optional). Open a template on the Emails tab to choose its theme and design.
Once verified, the checklist disappears and the tab shows your sending address with a Sending on badge.
OrderPilot checks your DNS records daily. If a record disappears — for example after moving to a new hosting provider — sending pauses and you receive an alert. Changing your sending domain cancels any queued or scheduled emails; sending stays off until the new domain is verified.
Sender Settings#
After setup you can update:
- Sender name — the display name customers see.
- Reply-to address — where customer replies land (optional; defaults to the sender address).
- DNS host — a selector for common registrars that pre-fills the record format.
- Check again / Change domain — recheck DNS or switch to a different domain.
- Remove email setup — disconnects your domain and stops all customer emails.
Emails Tab: Designing and Organising Templates#
Templates are organised into email groups. A group represents one kind of customer communication (for example "Invoice"). The statuses that trigger it are set on the group, and the group can hold one or more template designs.
Email Groups#
Each group card shows how many statuses send it. Hover to see which ones. To change when a group sends, click ⋯ → Choose when to send…, select the statuses under Sends when an order reaches, and click Save.
Each status can belong to only one group. Moving an order to Draft never triggers an email.
To create a group, click New group, give it a name, assign statuses, and click Create group. Add at least one published template before the group will send anything.
You can drag groups to reorder them on the page.
Creating and Duplicating Templates#
Click New template (or ⋯ → Duplicate on an existing one):
- Enter a Name and choose the Group.
- Pick a starting point: Start from a theme or Copy a template.
- Click Create template. The template opens in the editor as a draft.
Available themes: Ledger, Gallery, Summary, Paper, Statement, Minimal, and the legacy Classic.
The Template Editor#
The editor shows a panel on the left and a live preview on the right.
Details card
- Template name, group, and subject line.
- Use Insert detail (or type
/in the subject) to add merge-field tokens such as{{document.type}}or{{order.number}}. Tokens are shown as resolved values — the editor displays what the customer will actually see.
Design card
- Brand colours, body font, and email width.
- Reset to shop colours returns to your shop defaults.
- Brand tokens (logo, colours, location name) resolve using a brand → shop fallback with contrast-safe foregrounds.
Blocks card
- Building blocks: Header, Message, Line items, Totals, Button, Footer, and Raw HTML (an escape-hatch block for custom markup).
- Click Add to insert a block; drag blocks to reorder them.
- Every template needs exactly one Message block. It holds the message staff type when sending, or a Default message when they leave it blank.
Preview
- Switch between Desktop and Mobile views.
- Toggle Dark mode preview.
- Pick any recent quote or order from the toolbar picker to preview with real data. Unsaved edits reflect live in the preview.
- A built-in caniemail linter flags CSS properties and HTML patterns that won't render in common email clients.
Publishing Changes save as a draft automatically. Click Publish when ready — customers only receive the published version. A group with no published template sends nothing.
Version History#
From the editor's ⋯ menu, choose Version history. Every publish saves a version. Select a version to compare it with your draft, then click Restore to copy it into the draft. Restoring does not change what's live until you publish again.
Template Actions (⋯ Menu)#
| Action | What it does |
|---|---|
| Duplicate | Create a copy with its own subject and design. |
| Rename | Change the template name. |
| Move to group… | Reassign to a different group. |
| Send test email | Send a preview to any address using sample order data. |
| Make it the default | Use this design when no brand-specific template applies. |
| Delete | Remove the template. Built-in templates cannot be deleted; duplicate them instead. |
Per-Brand Templates#
If brand grouping is on, you can route a group to a different template per brand. Use ⋯ → Brands… on a template to choose which brands receive it. The group's default template covers any brand without its own published design.
Notifications Tab#
The Notifications tab controls what gets sent automatically.
Workflow Status Auto-Send#
Send customer emails is the master switch. Turning it off stops all customer emails — including staff-sent emails — and cancels anything queued.
Each email group corresponds to a status trigger. The Send an email when an order is created toggle fires the group's email when an order is created in a triggering status (not only when it moves there later). Orders created in Draft never auto-send.
Shopify Webhook Auto-Send#
Emails can also fire automatically on live Shopify events:
- Payment received (Shopify payment webhook) — sends when Shopify records a payment on the order.
- Fulfillment updated (Shopify fulfillment webhook) — sends when Shopify marks items as fulfilled.
Each webhook trigger has its own template selector and on/off toggle.
Abandoned-Quote Reminders#
Send one follow-up to customers whose quote is still in Draft or Pending after a period of inactivity:
- Off by default; opt in per shop.
- One reminder per quote maximum.
- Wait before reminding: 24 hours, 48 hours, 72 hours, or 1 week.
- Send between: a time window in your shop's timezone (for example 9 am–6 pm).
- Reminder template: defaults to Quote follow-up; choose any published template.
Customers who have unsubscribed never receive reminders.
SMS Notifications#
If Twilio is connected, each workflow status has a separate SMS toggle alongside the email toggle. You can send a test SMS, manage suppression, and uninstall the Twilio integration from this section.
Salesperson CC#
Staff credited on an order are automatically CC'd on its customer emails so they stay on the thread when the customer replies. To CC additional addresses on every customer email, enter them in Also copy these addresses (comma-separated) and click Save. Invalid or suppressed addresses are silently skipped and never block the customer email.
Order-Confirmation Emails#
A separate toggle controls whether customers receive an order-confirmation email when an order is created. This is independent of the workflow status triggers.
Default CC Tab#
Sets the addresses pre-populated when staff compose a Purchase Order or Sales Order email. Staff can still remove individual addresses before sending.
- Default CC and BCC — shop-wide defaults per document type (up to 5 addresses per type).
- Per brand — optional override for a specific brand.
- Per location — optional override for a specific location.
Each brand and location has an on/off switch. When off, that override is ignored and the parent level applies. The most specific setting wins: location → brand → shop. An empty override falls back to the next level.
The Default CC tab shows a preview of what each location is currently pre-filled with, so you can verify the cascade without opening every override.
Activity Tab#
The Activity tab gives a 30-day view of email engagement and a searchable send log.
- Engagement overview — proportion of emails delivered, opened, clicked, and bounced over the last 30 days. Open counts are estimates based on pixel tracking.
- Send log — every email sent, with date, recipient, order, template, and delivery status. Filter by group or status; search by customer name or order number. Click View to see recipients, the message body, and per-send delivery events (delivered, opened, bounced, etc.) sourced from the sending provider.
Email statuses: Scheduled, Sending…, Sent, Delivered, Opened, Clicked, Bounced, Failed, Cancelled.
Email Logs on Orders and Quotes#
Every order has a View all emails link that opens an order-scoped log. It shows:
- Every email sent for that order, with delivery status.
- Rows for sign-page opens (when a customer opens a signature or payment link).
- Email-open events recorded by tracking pixel.
Staff can also compose, preview, draft, and schedule emails from the order. The email composer pre-populates the Auto CC box with the salesperson list; individual CC items can be removed before sending.
Email Logs on Purchase Orders#
Purchase Orders have their own View all emails link showing vendor emails within the retention window. The PO email workflow has three states:
- Draft — the email is being composed; the PO is not yet sent to the vendor.
- Sending — the email is queued or in transit.
- Sent — delivery confirmed. You can Confirm as Sent manually if the PO was communicated outside the system, or Resend to send again.
Unsubscribe#
Every customer email includes a signed, per-recipient unsubscribe link. Clicking it opens a public confirmation page. OrderPilot also sends RFC 8058 one-click List-Unsubscribe headers, so email clients can offer a one-click unsubscribe without the customer needing to open the email.
Unsubscribed recipients are excluded from all future customer emails and abandoned-quote reminders. Their address is never used even if it appears in a CC list.
Tips#
Publish before you rely on a template. A template is a draft until you click Publish. A group with no published template sends nothing.
Turning off customer emails cancels the queue. To stop only one status from sending, remove it from its group rather than turning off the master switch.
Send a test after any design change. Use ⋯ → Send test email. Tests use sample data and are never copied to CC addresses.
Sending paused? If you see Sending is paused for safety, OrderPilot stopped email due to delivery problems (bounces or spam reports). Contact support to review and re-enable.
Need Help?#
Trouble verifying your domain or setting up notifications? Reach out at support@bevycommerce.com.